Example of Kaatib And Raakim's Typing
Installation Help For Win 3.11
Keep me posted about how you get on with either Kaatib and Raakim. Or if you have any tips or suggestions about them, I'd like to know about them.
The downloads for Kaatib and Raakim have been moved to the downloads page. Please click on the link below to download the programs.
Here is a screenshot of a file which I have prepared to show just what Kaatib and Raakim can do. This file is a Kaatib file so you can open it in Kaatib by selecting open on the file menu and then typing giving help when prompted for a name
Dear Reader
Here is My Very Own Help File For Installing Kaatib in Win 3.11:
Click on Kaatib and Kaatibdo to run them. Let the Programs run, do not interfere with them. The next step is to create a program group in Program Manager.
Do this by selecting New... on the File Menu. Then select Program Group and click OK. A Dialog Box will appear asking you for some information. Just Type Kaatib in the description file box. Leave the Group File Box empty. Click OK. A program group will now (Hopefully!) have been created. In this Group you can now create shortcuts to the Program itself.
To create a shortcut firstly ensure that the Raakim Program Group is Active (i.e. its Title- bar is Blue). Then select New... on the File Menu. Next select Program Item and click OK. A Dialog Box will appear in Description You can type whatever you want to call the Short- cut (i.e. Kaatib). To select the program to which you want to create a shortcut click on browse. Click on the Kaatib directory ( i.e. C:\KAATIB) and then select the file kaatib.exe click OK to select the file.
If you would like to have the correct Icon for the program click on the Button Change Icon Ignore any error message that appears. In the next dialog box click browse and browse to the Kaatib directory and select rakim.ico Click OK. Click Ok Again when the next Dialog Box appears. In the Working directory box type: C:\KAATIB\ (Or Whatever Directory you have place Kaatib)
Listed below are three more files which you should create shortcuts to. These files do not need different icons created for them:
Keyedit.exe
This Program Shows you the Keyboard layout, ignore what the program says about the numeral
keys characters though. Its not True!. That's about all you need to get started.
katbhelp.txt:
This is the text version of Kaatib's Help file which I prepared. Read it you'll find it
useful .
htmhelp.htm:
Alternatively you might want to read the same file in Html format with all the links
active. Be warned though that Netscape isn't responding very well to the inter-document
references.
If you have any troubles contact Me via e-mail
To whoever it may be of any concern and it may help.
The two programs are identical except for the fact that Kaatib is meant to be a DTP
(Desktop Publisher) while Raakim is meant to be a word Processor.
Both Kaatib And Raakim are Ms-Dos Programs. Both these files will extract themselves
automatically. This section just refers to making a Program Group in Windows 95/98. If I
had had it my way you wouldn't need to do this.
Kaatib:
This program is split into two Files which are:
Kaatib & Kaatibdo
To install Kaatib click on both files. Clicking On Kaatib's file (ktb.exe)
will Run Kaatib, while clicking on Keyedit.exe will show you Kaatib And
Raakims Keyset i.e where Alif, Bay are. Note in Keyedit the letter on the top of a key
(i.e on A there is Alif at the bottom and Alif-Mad at the Top. Alif at the bottom
signifies that when you press A normally Alif will be typed and if CapsLock/Shift is
pressed Alif-Mad is typed).
Don't Mess with UP since this is the Print Program.
Also to access the menus in Both Kaatib And Raakim you have to press ALT+F first (Mugar
Kyoon) then use the cursor keys to scroll through the menus.
Enjoy Typing and Printing.
Raakim:
This has two files:
Raakim & Raakimdo.
Again click on them to install Raakim. Raakim's file is QUT.exe.
Creating Shortcuts on the Desktop and StartBar For Raakim and Kaatib.
On the Desktop:
Right Click the Desktop and select New...Shortcut from the Menu.
A dialog Box Will Appear browse through to the Directory and click on the file you want a
shortcut for i.e. click QUT in The Raakim Directory to create a shortcut for Raakim. Name
the File and then press Finish.
If you want to Change the Shortcuts Icon Right click on it. Select Properties click on the
Program Tab and select Change Icon. Browse through to the Raakim/Kaatib directory an click
the Icon File to change the Icon.
On the Start Bar:
Click on the Startbar, then Settings for the Taskbar. Once the Dialog Appears click on
Start-Menu programs.
Click on Add again browse through the directories to select the File. Once you have
selected a file either create a new Program group by clicking on New Folder or Click on
Another Folder to place the Shortcut in there.
There now that I have told you all you need you should have no problems in setting up
these programs.
Have Fun
Shehzad Ashiq Ali
Top: 0.75
Bottom: 0.75
Right: 1.25
Left: 1.25
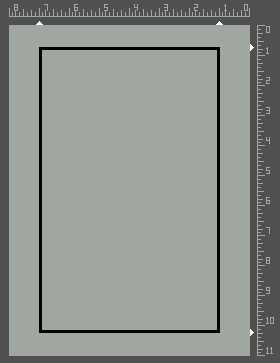
to ensure you get the best printing layout. Go to Layout on the Page Layout menu. You're Page should look similar to this
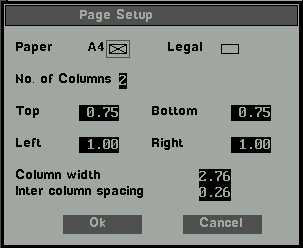
No of Columns: 2
Top & Bottom: 0.75
Left & Right: 1.00
Column Width:2.76
Inter Column Spacing: 0.26
I'll just show you an example of it done by me. So that you do not get confused
You're Page should now look like this in the Page-Layout Screen:
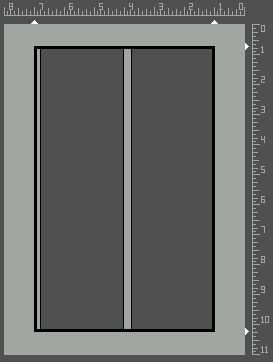
Have Fun Typing
These are the key-settings of Kaatib and Raakim. This is a
screenshot of the Program Keyedit, which is supplied in the Kaatib Package. It isn't
entirely correct though since you can't get numbers unless you're prepared to mess about a
bit with the program.
This help-file has been painstakingly converted to HTML by
me. I spent Hours making up all the Hyperlinks and then checking them. So if you decide to
distribute this or put it up on your webpage, please do give credit to me.
Please note that not all of the features mentioned here work in Raakim as this is Kaatib's
help file
Shehzad Ashiq Ali
The base font size - the font size in which the entire document barring individual lines for which font size has been varied - can be selected from the Document sub-menu using the Base Font option. Exercising this option will cause the font sizes screen to be displayed showing only the six font sizes, between 8 points and 28 points, from which one may be selected as the base font. The currently selected base font size is denoted by an asterisk appearing to the left of the current size.
Invoking the CENTRE option from the Paragraph sub-menu causes the paragraph at which the cursor is positioned to be printed in centre of the page, keeping in regard the left, right margins specified for the document. If CENTRE is set ON for the said paragraph a diamond shaped symbol will appear to the left of the Centre option bar in the pull down menu.
"Block Copy" option of the EDIT sub-menu copies the "MARKED" text in the work area, and the text is then unmarked. the block thus copied can then be inserted anywhere in the document at any time. The system responds with a message "Block copied to scrap " in the message area.
See:
"CUT" option of the EDIT sub-menu copies the "MARKED" text in the work area, and removes the block from the document, the text is then unmarked. the block thus copied can then be inserted anywhere in the document at any time. The system responds with a message "Block cut to scrap " in the message area.
See:
"DELETE" option of the EDIT sub-menu removes the "MARKED" text from document. The system responds with a message "Block deleted " in the message area.
See:
Ends the current session of RAAKIM's editor and returns the user to the Opening Menu. If the system detects any changes in the document that are not saved onto the disk, the system will wait for the reply to the message "File not saved, save (Y/N/C)" before returning the user to the Opening Menu.
The font size of individual paragraphs can be varied from the base font of the document. It is possible to change font sizes within a document by exercising the "FONT SIZE" option on the Paragraph sub-menu which will cause the font sizes screen to be displayed. The currently selected base font is denoted on this screen by an asterisk to the left of the font size so selected. The font size for the current paragraph can be chosen by using the cursor up and down keys to highlight the desired font size and then pressing the ENTER key. The selection of this font will be signified by a pointer appearing to the left of the font size. When a font other than the base font is chosen for a paragraph, the ruler on top of the document is changed accordingly to reflect the correct size of the font.
Invoking the GREY option from the Paragraph sub-menu permits text in the paragraph at which the cursor is positioned to be output with a Grey background on the printer. If GREY is set ON for the said paragraph a diamond shaped symbol will appear to the left of the Grey option bar in the pull down menu.
Line spacing for the document in the work area may be set using one of the four available options in the DOCUMENT sub-menu. The increased line spacing is 120 % of the normal line spacing. current line space setting will be shown by a shaded pointer to the left of the selected line spacing value in the pull down menu.
INDENTS can be set for a particular paragraph, by placing the cursor in that paragraph and selecting the INDENTS option from the Paragraph sub-menu. Specify values for the left , right, and first_line indents and press OK, the paragraph is then set and displayed accordingly. To create hanging indents specify a negative value for the first_line indent.
Inter word spacing is the spacing between two consecutive words. The default value for inter word spacing is set at 1 and can be modified to any value uptil 25 through the WORD SPACING option of the DOCUMENT sub-menu.
Left justification of text can be switched on or off for a particular paragraph, regardless of the default set for the whole document through the JUSTIFY option of the DOCUMENT sub-menu. If justification is set ON for the paragraph in the work area a diamond shaped symbol will appear to the left of the JUSTIFY option bar in the pull down menu. If it is set OFF this symbol will not be displayed. Default value for a paragraph is the same as set through the Document sub-menu.
Left justification of text can be switched on or off for the whole document through the JUSTIFY option of the DOCUMENT sub-menu. If justification is set ON for the document in the work area a diamond shaped symbol will appear to the left of the JUSTIFY option bar in the pull down menu. If it is set OFF this symbol will not be displayed. Justification is set ON as a default for the document.
Line spacing for the document in the work area may be set using one of the four available options in the DOCUMENT sub-menu. The current line space setting will be shown by a shaded pointer to the left of the selected line spacing setting in the pull down menu, however if a different line spacing is required for a particular paragraph, this can be achieved by specifying the required number of lines per page, through the Lines per Page option of the Paragraph sub-menu. while the lines per page is the total number of lines that will fit in a pages with respect to the BASE FONT.
Line spacing for the document in the work area may be set using one of the four available options in the DOCUMENT sub-menu. Apart from the standard normal, reduced and increased line spacing, line spacing can also be specified in terms of the number of lines that would fit in a page, with respect to the base font selected. current line space setting will be shown by a shaded pointer to the left of the selected line spacing value in the pull down menu.
Margins can be set using the PAGE sub-menu. Top and Bottom margins can be set in combination to vary the page length between 1" and 10". Similarly the Left and Right margins can be set in combination to vary the width of the page between 1" and 6". Invoking the page set-up option of the PAGE sub-menu, causes a dialogue box to appear on the screen. The values displayed against each of the margins are either the default values of 2" for each margin, or the current values as previously set by the user using this option. These values can be changed individually or at a single keystroke, reverted to the default values.
Any portion of the on-screen document file may be marked for use with other features of RAAKIM. Marking a block Move the cursor to one edge of the text you want to mark. Hold down the Shift key. Use the cursor movement keys (left, right, up, down, page up and page down) to locate the cursor at the opposite edge of the text. Release the shift key. The block thus marked may be used with other features of RAAKIM such as cut, copy, paste and delete. A marked block of text appears on the screen in Reverse. Press any key other than the keys used to mark a block and the menu key.
Line spacing for the document in the work area may be set using one of the four available options in the DOCUMENT sub-menu. The normal line spacing is set as a default for the document. current line space setting will be shown by a shaded pointer to the left of the selected line spacing value in the pull down menu.
NEW option of the FILE sub-menu, will cause the contents of the work area to be deleted and a new document to be started before the existing document is deleted from the work area. However, the system will wait for the reply to the message "File not saved, save (Y/N/C)" before it clears the work area. the new document is setup using the default document settings. Simply invoking RAAKIM and typing on the presented screen also causes a new document to be set up.
To open an existing document use the OPEN option of the FILE sub-menu. The system will respond with the message "Enter file name:".The name of the file to be opened can then be entered with or without the extension. If the system is able to locate the file, it will bring its contents into the work area, and display the first page on the screen. If not, the message "FILE NOT FOUND" will be displayed on the screen.The file name need not be entered in its complete form.
Page layout option of the PAGE sub-menu displays the current page layout for the document according to the margins specified.
Changes paragraph 4formatting to match the document defaults set through the Document and page_Layout menus. If any of the options from the paragraph menu were exercised on that paragraph, their effect is also reversed.
"PASTE" option of the EDIT sub-menu inserts the block of text previously copied in the work area by a "BLOCK COPY" operation, at the current cursor position.
See:
COPYING TEXT CUT A MARKED BLOCK
To print a document choose the PRINT option from the FILE sub-menu or select the PRINT Utility option from the OPENING menu. This will cause the display of the PRINT Utility Screen. Entering desired values on this screen and moving the cursor to the "OK" bar on the screen and pressing the ENTER key will cause printing to commence. Note that the document is printed from the disk and not from the work area. Therefore, if any changes have been made to the document in the work area, invoking the print option causes a system prompt asking whether the file should be saved.
Line spacing for the document in the work area may be set using one of the four available options in the DOCUMENT sub-menu. The reduced line spacing is 80 % of the normal line spacing value. current line space setting will be shown by a shaded pointer to the left of the selected line spacing value in the pull down menu.
Invoking the REPAGINATE option form the FILE sub-menu causes the document in the work area to be repaginated according to the default margins or if they have been changed, according to the selected margins, taking in account the font sizes and line_spacing settings used.
Invoking the REVERSE option from the Paragraph sub-menu permits text in the paragraph at which the cursor is positioned to be output in Reverse on the printer. If reverse is set ON for the said paragraph a diamond shaped symbol will appear to the left of the Reverse option bar in the pull down menu.
Use the SAVE_AS command from the FILE sub-menu. The system will display the message "Enter new file name". The desired file name should be entered using valid naming characters as specified in the NAMING CONVENTIONS section of the RAAKIM's user reference manual.
Use the SAVE command from the FILE sub-menu. The system will ask you to enter a new file name. Enter a name using valid naming characters as described in the section on NAMING CONVENTIONS. Once you have saved the document, whenever you use the SAVE command again for it, the system will automatically save the document with the name originally given to it. While creating or editing a document, any changes you make are only stored temporarily in your computer's active memory. A document is not stored permanently until you save it to a disk. You should, therefore, save the document you are working on from time to time. You can save a document without losing your place on the screen and then continue creating or editing it.
TAB positions for a particular paragraph can be changed from the default settings of the document by invoking TABS option of the paragraph sub-menu. the procedure for changing tab settings is the same as setting tabs for the whole document.
See:
From the DOCUMENT sub-menu invoke the "Tab Settings" feature. To remove an existing tab move the cursor to it and use the space key to remove the tab. To insert a new tab setting, use the cursor movement keys to position the cursor at the required point and use the space key to set the tab there. Once all required settings have been made, the ENTER key is used to put them into effect. TAB positions for a particular paragraph can also be changed from the default settings of the document by invoking TABS option of the paragraph sub-menu. Maximum of ten tab settings are allowed in the document.
See:
Invoking the UNDERLINE option from the Paragraph sub-menu causes the paragraph at which the cursor is positioned, to be underlined when printed. If UNDERLINE is set ON for the said paragraph a diamond shaped symbol will appear to the left of the Underline option bar in the pull down menu.
Help File prepared and edited into Html format from Text format by: Shehzad Ashiq Ali
If you think I have missed out on anything in these programs, then please contact me so I can put the information up. You would would be given full credit for your help.
If there are any good Urdu Word Processing Programs you know of then please contact me, so I could hopefully be able to end my search for the ultimate Urdu web Processor.
Thanks to Faisal Chughtai for putting Kaatib And Raakim up on his webpage in the first-place. Allowing many people to benefit from these programs. Good on you Faisal!
| This page has been
visited this many times according to Fortune city |
Last Updated: 25th April 2002 Thursday
PAGE CREATED BY:
ASHIQ ENTERPRISES ™ 1999
Copyright held by: Shehzad Ashiq Ali